

As I've been chronicling in my Adventures in Android series, I've been working on an Android app. I'm pleased to announce that today I have published Audio Auto-adjust 1.0.0 to the Android Market. I'd like to take this opportunity to provide a brief overview of what Audio Auto-adjust is and how to use it.
While there are numerous volume control apps already on the Android Market, I wrote this app to because I had some very specific needs that I wanted to address. I wanted an app that didn't leave services constantly running in the background, yet I wanted an app that would be responsive to system actions. In particular, I wanted to be able to save my audio settings as presets, and then associate those presets with actions.
The Main Activity

Here is the main activity as it appears in the portrait orientation. As you can see, the various audio streams are easily adjusted by moving the slider controls.

The toolbar across the top provides three widgets. The first button on the left toggles silent mode. The next button saves the current volume configuration to a preset. The third widget is a dropdown that displays the currently active preset (if any) and allows you to switch to a different preset. This widget is only enabled when there are two or more presets that have been saved.
Notice that some of the streams are identified by hyperlinks. Those hyperlinks lead to context menus for additional configuration settings that are permitted for the selected audio stream.
To access Audio Auto-adjust's advanced features, select your phone's menu button to activate the main menu. Note that the Edit Presets and Actions options are only available if you have already saved at least one preset.

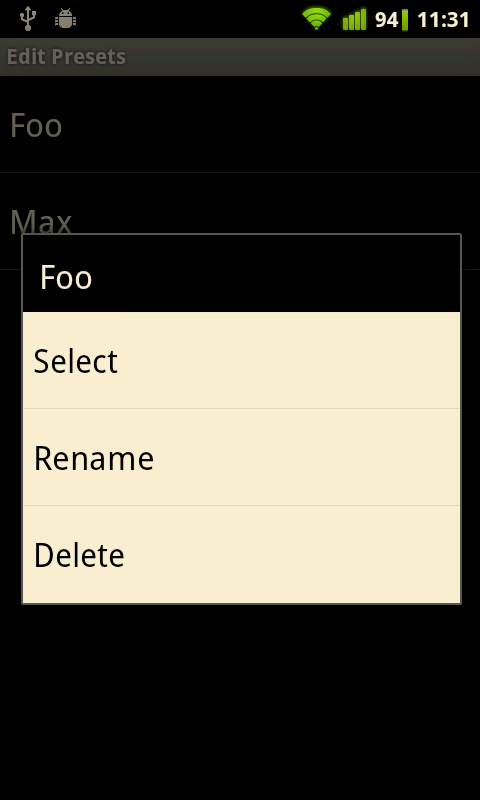
Edit Presets Activity

This activity lists all the presets that have been saved in Audio Auto-adjust. In this example I have saved two presets, "Foo" and "Max." Touching one of those presets will command Audio Auto-adjust to switch to that preset. Long-pressing a preset, however, raises a context menu that allows you to modify that preset. For example, long-pressing the "Foo" preset presents this menu:
Actions Activity
The most powerful feature of Audio Auto-adjust is the ability to associate presets with system actions. My personal use case for this was when I enter my car and my phone connects to my vehicle's hands-free system via Bluetooth. Upon receiving notification that my phone has connected to my car, Audio Auto-adjust will automatically switch to an associated preset.

Each row in this activity lists a system action that may be associated with a preset. Actions containing "(None)" are simply ignored by Audio Auto-adjust. To associate an action with a preset, select the action's corresponding dropdown, and then choose a preset from the list.
A Note About Precedence
The order of the listed system actions in the "Configure Actions" activity affects the precedence of those actions. Entries that are located higher on the list are given a higher precedence by Audio Auto-adjust. If more than one system event is activated at the same time, the action with the highest precedence is the one that will be activated by Audio Auto-adjust.
Precedence may be adjusted by placing your finger on the grip on the left side of the row, and then dragging it up or down to your desired position.
Settings Activity
I've tried to ensure that each preference in the settings activity contains a useful summary. Here's a brief overview that goes into a bit further detail:
- Volume Control Stream: Chooses which audio stream will be adjusted by your phone's hardware volume controls. Note that this setting only applies when Audio Auto-adjust is running in the foreground.
- Background Notification: When enabled, Audio Auto-adjust will post a notification whenever it switches presets while running in the background.
- Play Sounds: When adjusting volume settings, play sounds to illustrate the loudness of the setting.
- Tie Ring Volume: When set, hide the controls for the Notification audio stream. Instead, the Ring audio stream will control both itself and the Notification stream.
In Conclusion
My goal with Audio Auto-adjust was to make a volume control app that fulfilled my needs. I hope that is as useful to others as it is to me. In the future I plan to expand the app with additional features, so please stay tuned!